For all technical questions. VIEWABLE without login, you need to register (free) to be able to post a question.
-
ryanandcharl
- Full Member
- Posts: 83
- Joined: Fri Jan 13, 2023 7:35 pm
- Has thanked: 7 times
- Been thanked: 2 times
Post
by ryanandcharl » Mon May 13, 2024 8:34 pm
Just a quick one on rebuilding the rear callipers
After removing the piston I find the threaded insert staring at me. I’ve read the old posts explaining what this does in regards to play but I just want some help understanding how to reinstall and put back together.
Does the piston wind back in or press? Also where do I set the nut on the thread before installing the piston?
I thought I did it correct but after bleeding the system my handbrake now has 100+ clicks

id rather ask for help than waste more good fluid
Thanks all
-
Micron
- Site Admin
- Posts: 3531
- Joined: Thu Sep 06, 2018 6:08 pm
- Location: South Norfolk
- Has thanked: 62 times
- Been thanked: 96 times
Post
by Micron » Tue May 14, 2024 7:53 am
The piston is wound in and out, by means of the adjuster, which is accessed via the small bolt on the back (12mm head), use an Allen Key to make the adjustments. If you put in the Allen Key and it does nothing, then check that it's actually in there.
As for final adjustment, different people have different ideas, but once the air if out of the system, loosen the handbrake cable at the handbrake end (10mm long reach socket or box spanner), some people will put 2 clicks on the handbrake. Then under the car, start to wind the piston out, ideally with the wheel on as that gives you more leverage when trying to move it by hand. Continue to adjust and check until you are happy with the result once you have pulled the hand brake up to 4-6 clicks after adjustment, return to 2 clicks before making any further adjustments
I hope that makes sense?
Admin and Owner of this fine club

Location : South Norfolk
-
jrh
- Full Member
- Posts: 1087
- Joined: Thu Sep 20, 2018 3:08 pm
- Been thanked: 46 times
Post
by jrh » Wed May 15, 2024 5:54 pm
Only an Oriental mind could have designed the rear brake assembly.
Work or fail is entirely down to the condition of the lip seal around that shaft connected to the handbrake cable.
Here it comes Trev.
You need to pack your strip of ..............DENSO tape round that shaft to give the lip seal a fighting chance of keeping the water out.
-
Micron
- Site Admin
- Posts: 3531
- Joined: Thu Sep 06, 2018 6:08 pm
- Location: South Norfolk
- Has thanked: 62 times
- Been thanked: 96 times
Post
by Micron » Wed May 15, 2024 7:51 pm
jrh wrote: ↑Wed May 15, 2024 5:54 pm
Only an Oriental mind could have designed the rear brake assembly.
Work or fail is entirely down to the condition of the lip seal around that shaft connected to the handbrake cable.
Here it comes Trev.
You need to pack your strip of ..............DENSO tape round that shaft to give the lip seal a fighting chance of keeping the water out.

Admin and Owner of this fine club
Location : South Norfolk
-
ryanandcharl
- Full Member
- Posts: 83
- Joined: Fri Jan 13, 2023 7:35 pm
- Has thanked: 7 times
- Been thanked: 2 times
Post
by ryanandcharl » Fri May 17, 2024 6:51 pm
Micron wrote: ↑Tue May 14, 2024 7:53 am
The piston is wound in and out, by means of the adjuster, which is accessed via the small bolt on the back (12mm head), use an Allen Key to make the adjustments. If you put in the Allen Key and it does nothing, then check that it's actually in there.
As for final adjustment, different people have different ideas, but once the air if out of the system, loosen the handbrake cable at the handbrake end (10mm long reach socket or box spanner), some people will put 2 clicks on the handbrake. Then under the car, start to wind the piston out, ideally with the wheel on as that gives you more leverage when trying to move it by hand. Continue to adjust and check until you are happy with the result once you have pulled the hand brake up to 4-6 clicks after adjustment, return to 2 clicks before making any further adjustments
I hope that makes sense?
Thanks, I think so haha
So when replacing the pads would you still press the piston back with a flat head or does it need winding back? Would pressing back damage the system?
-
Micron
- Site Admin
- Posts: 3531
- Joined: Thu Sep 06, 2018 6:08 pm
- Location: South Norfolk
- Has thanked: 62 times
- Been thanked: 96 times
Post
by Micron » Fri May 17, 2024 6:52 pm
Winding back, or you risk breaking the mechanism
Admin and Owner of this fine club
Location : South Norfolk
-
ryanandcharl
- Full Member
- Posts: 83
- Joined: Fri Jan 13, 2023 7:35 pm
- Has thanked: 7 times
- Been thanked: 2 times
Post
by ryanandcharl » Fri May 17, 2024 6:59 pm
Micron wrote: ↑Fri May 17, 2024 6:52 pm
Winding back, or you risk breaking the mechanism
Ooo ok.. I did push back one side so I’ll cross my fingers.
One last thing before I’m all set… do you know what size winder I need? Hard to believe my 8 SIDED one doesn’t fit
Thanks

-
Micron
- Site Admin
- Posts: 3531
- Joined: Thu Sep 06, 2018 6:08 pm
- Location: South Norfolk
- Has thanked: 62 times
- Been thanked: 96 times
Post
by Micron » Fri May 17, 2024 7:03 pm
ryanandcharl wrote: ↑Fri May 17, 2024 6:59 pm
Micron wrote: ↑Fri May 17, 2024 6:52 pm
Winding back, or you risk breaking the mechanism
Ooo ok.. I did push back one side so I’ll cross my fingers.
One last thing before I’m all set… do you know what size winder I need? Hard to believe my 8 SIDED one doesn’t fit
Thanks
You need an Allen key ( not sure of the size) that fits in to the hole where you removed the 12mm bolt.
There is a small splined winder and the Allen key fits in to it. Just make sure it doesn’t come out and you loose it.
Admin and Owner of this fine club
Location : South Norfolk
-
Kit
- Tech Rep
- Posts: 3628
- Joined: Fri Sep 07, 2018 8:16 pm
- Location: Vange, Basildon
- Has thanked: 75 times
- Been thanked: 118 times
Post
by Kit » Sat May 18, 2024 10:43 am
4mm allen key
Kit
-
ryanandcharl
- Full Member
- Posts: 83
- Joined: Fri Jan 13, 2023 7:35 pm
- Has thanked: 7 times
- Been thanked: 2 times
Post
by ryanandcharl » Mon May 20, 2024 11:19 am
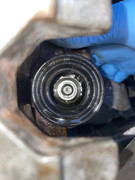
Ok so back with hopefully some last questions after fluid pushing the piston out to change the seal.
When reinstalling the brake piston, how far down do I thread the internal nut onto the threaded shaft/adjuster (see photo). Does the end of the thread need to touch the piston or do I need the nut flush? Or do I bottom it out (therefore leaving a good amount of thread showing behind the piston
Hope I’m making sense
Thanks all
Who is online
Users browsing this forum: No registered users and 84 guests
